Saturday, November 21, 2009

How to convert the HTTP protocol to HTTPS (SSL) for NetWeaver AS Java

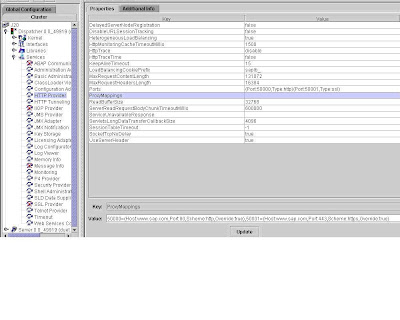
1. Change the port mapping of the HTTP Provider Service (ProxyMappings property) on the Java dispatcher. Use the Visual Administrator tool to perform this configuration task.

2. Open the Properties tab of the HTTP Provider Service running on the dispatcher.

Define the port mapping as a value of the ProxyMappings property. The value represents a comma-separated list of multiple port mappings.A single port mapping has the following format:

<Port to be mapped> =(Host:<hostname>,Port:<port number>,Scheme:<scheme>,Override:<true/false>)

By default the "Override: attribute" has a value of false. That is, if the client request contains information about the client's host and port, the HTTP Provider Service does not override its values with the values of the corresponding attributes of the ProxyMappings property. However, if no host and port information is present in the request, it takes the values of the Host: and Port: attributes of the property and sets them to the response. If, on the other hand, you set the Override: attribute to true, the values of the Host: and Port: attributes are always set to the response even if the request contained host and port information.

Defining a Single Mapping

If you have your engine installed on host localhost and port 50000 and want to map it to your proxy server with host name www.sap.com and port 80, enter the following as a value of the ProxyMappings property:50000=(Host:www.sap.com,Port:80,Scheme:http,Override:true)

Defining Multiple Mappings

If, in addition to the above mapping, you want to open port 50001 on host localhost on your engine and map it to port 443 on your proxy server with host name www.sap.com for HTTPS requests, enter the following as a value of the ProxyMappings property:50000=(Host:www.sap.com,Port:80,Scheme:http,Override:true),50001=(Host:www.sap.com,Port:443,Scheme:https,Override:true)
You should map only one host to a given proxy port! Multiple hosts per port mappings may not work as expected in cases of HTTP 1.0 clients.

3. Choose Update to add it to the list of properties.

4. To apply these changes, choose Save Properties.

Tuesday, November 17, 2009

Differences between SAP Netweaver EP and EPC

In SAP Netweaver we have had two Portal usage types (UT):

* EP: Enterprise Portal
* EPC: Enterprise Portal - Core


Q: What is actually the difference between the EP and EPC?

A: EP stands for Enterprise Portal – the well-known SAP Portal installation that includes all Portal components and functionality. EPC stands for Enterprise Portal - Core – is a leaner installation of the Portal that includes only the core Portal functionality without additional functionality such as Knowledge Management, Collaboration, etc.

Q: When should I use each usage type?

A: If you are implementing a full Enterprise Portal, you should go for EP because this gives you a full Enterprise Portal with all Portal functionality, Web Page Composer (WPC), Knowledge Management, Collaboration, and so on. If you are looking for a leaner installation that consumes less memory, disk size and other resources, you should install EPC. Keep in mind that you can move from EPC to EP at any stage.

Q: How are these usage types distinguished in the SAP NetWeaver installer?

A: For EPC installations, you should select EP Core (in addition to the other components that you want to install), as seen in screenshot below.

To install EP, you should select EP (in addition to the other components that you want to install).

Thursday, November 5, 2009

Integration Non-SAP J2EE-based Web Applications into SAP Portal with SSO

Overview of Integration

To perform this integration must take into account the following steps:

1. Deployment of the portal application for the creation of the system portal object
2. Create and set the type of Application Integrator iView that will contain the applications to integrate.
3. Installing SAPSSOEXT and SAPSECU libraries
4. Deployment of the application gateway called SsoGatewayWeb
5. Changing the target application.

This integration has the following restrictions:


1. It applies only for web applications based on J2EE Servlet.
2. Depend exclusively on the sucessful load of the libraries supported by SAP (sapssoext and sapsecu) in both Windows and UNIX environments.
3. The target application must have created a profile for the user id logged to the SAP portal, this should be equal to the id with which the logged user is in the portal.
4. It must have well-defined a web resource in the target application that allows the "login" to be used by iView of type "Application Integrator".
5. This solution is only applied to a SAP NetWeaver Portal 7.0.

These steps are broadly outlined below each of these steps.

Detailed Description.

1. Deployment of the application for establishment of portal partner.


We will need to deploy the application of type "Portal Application" on the portal. The name of such applications is:

com.cts.portal.appintegrator.webapp.par (link)

To install this applied to the portal will use the iView prescribed in:

"System Administration"> "Support"> Link "Portal Runtime"> "Administration Console".

To perform the action "Upload" ont "com.cts.portal.appintegrator.webapp.par" file as shown in Figure 1.


Figura 1. Admnistration console - “Portal Anywhere Admin Tools”


The purpose of this portal application is to define an object of the type "system" that will use with the Application Integrator component.

Now create the system object type in the PCD, based on the deployed file.

For this we must go to the iView "System Landscape Editor":
"System Administration"> "System Configuration"> "System Landscape.

Next, we will create a template system that use to create system objects to be used individually by each iView of this type, as discussed below.

2 .Template Creation System.

we will need to create a folder within "Portal Content" / "My Personal Content" with the same name of the application to integrate. Within it we'll create the folders: iView, Role and System.


Sunday, October 4, 2009

Using certificates with the SAP NetWeaver Portal

After you install your SAP NetWeaver Portal, you will probably access it using regular HTTP. So, you'll use a URL that looks like: http://theportal.mycompany.com:50000/irj. If you use a logon form where you enter your portal username and password, thiose details will be sent to the portal server unencrypted, which means that a malicious person could in theory find that combination.

But did you know that you can use secure sockets to access the portal? By default, the portal is installed with SSL enabled. This means that you can change your URL slightly so that instead of typing "http", you can use "https", but you also need to add 1 to the port number (the number after the :) so that your URL for the above example becomes https://theportal.mycompany.com:50001/irj.

However there are a few problems with this. Depending on your browser, you will probably get a screen that looks like either


or


This is because by default the portal's standard SSL certificate has a few problems. These are:

--it's self signed, which means your browser doesn't trust it;
--it's expired; and
--it's been issued for an unexpected web site, localhost, not the one in the URL you entered.

This can be seen by opening up the certificate details:


So, why has this happened?


Sunday, September 20, 2009

How to enable SAP BW Web functionality after a new SAP BW installation

You have just completed the technical installation of SAP BW 3.x. You wish to enable BW web functionality for your users and administrators to use. This functionalit y could include:

· Development and deployment of BW Web Applications
· XML data loads via the HTTP/SOAP interface
· Display and maintenance of BW documents
· Display of BW MetaData in a Web Browser

2 Introduction

The following steps enable you to perform the initial configuration of the SAP BW System to enable BW web functionality. This will enable you and your BW users to use web browser for all BW functions. It should be noted that these steps are the required minimum needed to enable these features.

Additional steps are required for more advanced features such as Single sign-on, implementation of SSL, customized web logon screens, etc. These advance features are documented in the online help documentation (http://help.sap.com) or in other How-To guides or Whitepapers available from the SAP Service Marketplace (http://service.sap.com/BW).

The How-to also provides simple steps to test your configuration from both a web browser and from the BW system itself and ensure its correctness.

3 The Step By Step Solution

The following guide outlines the steps required to enable SAP BW web functions. This will entail the checking of the host names, configuration of the Application server instance profile parameters, and testing of the configuration.

Saturday, September 12, 2009

Problems with the planning modeler and the planning wizard

Symptom:
You cannot start the planning modeler or the planning wizard, or they terminate with error messages.

This note describes the basic procedure for isolating problems with the planning modeler or the planning wizard and for providing information that SAP support requires to solve such problems as efficiently as possible. Below, the term planning modeler is used to refer to both the modeler and
the wizard.

Solution:

1. The ABAP back end and Web Dynpro Java must have the same Support Package version. You can determine the Support Package version for Java as follows:

a) Go to the start page of the J2EE Engine: http://server.company.com:port (Note that you must adjust the host server.company.com and the port accordingly).

b) Choose "System Information" and log on with the administrator user.

c) Under "Software Components", choose "all components".

d) In particular, check the version of the BI-REPPLAN and BI-WDALV software components.

2. When you start the planning modeler, the web browser issues one of the following messages "The page cannot be displayed" or "Application stopped" and it does not even display the initial screen of the modeler. There may be several reasons for this problem. To analyze this problem, proceed as follows:

a) If you used Transaction RSPLAN in the SAP GUI to start the planning modeler, then you must appropriately maintain the "Settings for Starting the Planning Modeler" in the Implementation Guide under 'SAP NetWeaver' -> 'Business Intelligence' -> 'BI-Integrated Planning'.

b) Check if the J2EE Engine is running. To do this, call the start page of the J2EE Engine (for example, http://server.company.com:port). If the system issues the message "The page cannot be displayed" at this stage, the J2EE Engine is not running.

c) Check if the Web Dynpro framework is running: Call a Web Dynpro application from the Web Dynpro framework, for example, the Web Dynpro test application
http://server.company.com:port/webdynpro/dispatcher/sap.com/tc~wd~samples~testsuite~uuie/TestSuiteUUIE. If you cannot start this test application, there is probably a problem with the Web Dynpro framework.

d) Check if the related software components are deployed: Call another Web Dynpro application from the software components BI-REPPLAN or BI-WDALV. If you cannot start the modeler http://server.company.com:port/webdynpro/dispatcher/sap.com/bi~plan
~workbench1/Modeler or the wizard
http://server.company.com:port/webdynpro/dispatcher/sap.com/bi~plan~workbench1/Wizard
or the ALV test application http://server.company.com:port/webdynpro/dispatcher/sap.com/bi~alv~
sample/TestALV the reason may be that the respective software components are not
deployed on the J2EE Engine. If necessary, contact your system administrator.

3. You have started the planning modeler,

Friday, September 4, 2009

SAP Portal URL is not accessible due to port blocking issues

Error: When we try to access portal URL, it will say "The page Cannot be displayed" even though the whole system is up and running.

Reason:The reason might be due to blocked port. First, whether your portal is using some customized http port number like 8080 instead of default port (500)

This can be checked by going to below path:

Open Visual Administrator -> Cluster -> -> Dispatcher -> Services -> HTTP Provider -> Check the value of the property "Ports".

If the value of this property is like below:

(port:8080,Type:http)(port:501,Type:ssl)

Then your http port was customized to 8080. In this case you can check whether your portal is able to access this port using telnet.

Procedure to know the port can be accessible by portal: Open SAP MMC and right click on the dispatcher under J2EE Process Table


now enter Login id as "administrator" and the password to login.

use command lsp to check the list of ports that are being used by your SAP Cluster:


Solution: To avoid such type of situations you can reserve such ports within windows.

Procedure: Follow below procedure to reserve the port you want to.

1. Start "regedit.exe"

2. navigate to following sub-key: HKEY_LOCAL_MACHINE\SYSTEM\CurrentControlSet\Services\Tcpip\Parameters

3. select entry "ReservedPorts" (double click).

4. Add here the port 1080 in that way:
1080-1080
(If there is already a port added please separate this port with a space or carriage return.
For example: "3456-3456
1080-1080")

5. Take a OS reboot of the server.

Friday, August 28, 2009

J2EE Engine Startup Errors codes and their Description

1. Positive exit codes which usually cause restart of server/dispatcher:

0 normal exit/shutdown
1 Forced shutdown was executed by the engine server side because of a non
recoverable error.
11 xml parser cannot be initialized by the engine server side.
64 Error while reading the properties for bootstrap process.
65 Error when bootstrap process tries to connect/work with the data
base.
66 Common error code for issues in bootstrap process. Check note 997510.
666 Could be caused by memory misconfiguration or memory leak of applications
involved. During startup misconfiguration is more reasonable. Under special
circumstances a hotspot error is generated instead of an
OutOfMemoryError (Note 597187).
888 When the shutdown of the server/dispatcher process cannot finish for the
preconfigured timeout, the VM is halt with this exit code. This happens if
there are many applications deployed on the system and some of them take
significant time to finalize the usage of common resources. Usually this is
not an issue as long as the consecutive engine start is flawless.
999 When an error occurs during engine shutdown the server/dispatcher process
will exit with code 999.

2. Negative exit codes which usually will not cause restart of server/dispatcher:

-1 JSTARTUP_INTERNAL_ERROR
This code is also used when experiencing issues with Wily Introscope. The
dev_server log file in the work directory contains the following message:
[Thr 7920] *** ERROR => can't find native registration class
[com.sap.bc.proj.jstartup.JStartupNatives] [jhvmxx.c 551]
Exception in thread "main" [Thr 7920] JLaunchCloseProgram: good
bye (exitcode = -1).

-2 JSTARTUP_VM_ABORTED

-3 JSTARTUP_INVALID_ARGUMENTS

-4 JSTARTUP_INVALID_SHUTDOWN

-6 comes from within the VM itself, in dev_jcontrol:
ERROR => JHVM_LoadJavaVM: Cannot create Java VM (rc=-6)
please check std_server.out, might be wrong parameter

-10 JSTARTUP_NO_MORE_MEMORY

-11 JSTARTUP_PARENT_ATTACH_ERROR

-12 JSTARTUP_TIMEOUT

-13 JSTARTUP_SYNC_SEMAPHORE_ERROR

-14 JSTARTUP_INVALID_PROPERTY_FILE

-15 JSTARTUP_INVALID_VMTYPE

-16 JSTARTUP_NO_PERMISSION

-17 JSTARTUP_INVALID_JDK

-18 JSTARTUP_NODE_NOT_FOUND

-100 JSTARTUP_NO_SYSTEMNAME

-101 JSTARTUP_PARAM_NOT_EXISTS

-102 JSTARTUP_INVALID_LOCAL_PROFILE

-103 JSTARTUP_CREATE_LOCAL_PROFILE

-104 JSTARTUP_NO_MORE_PROCESSES

-105 JSTARTUP_INVALID_PROCESS

-106 JSTARTUP_PROGRAM_ALREADY_RUNS

-107 JSTARTUP_SHM_NOT_INITIALIZED

-108 JSTARTUP_DEBUG_SESSION_ALREADY_ACTIVATED

-109 JSTARTUP_DEBUG_SESSION_NOT_ACTIVATED

-333 server/dispatcher process is restarted because it has missed a cluster
broadcast message due to network problems.

-334 server/dispatcher process is restarted because of error getting confirmation
during reattach to the message server.

-335 server/dispatcher process is restarted because of timeout for reconnecting to
message server has reached.

-336 server/dispatcher process is restarted because no notification is received
from message server.

-337 server/dispatcher process is restarted because exits listener loop.

-338 server/dispatcher process is restarted because of invalid message.

-339 client is not authorized to access the message server.

-1000 JSTARTUP_PROCESS_IS_STOPPED.

-1001 JSTARTUP_PROCESS_WAITERROR

-1501 server/dispatcher process is not able to start because the initialization of
some manager ends up with error.

-11111 server/dispatcher process is stopped due to license expiration.

-11112 server/dispatcher explicit shutdown is invoked from shell command or Visual
Administration tool. No restart will be performed. Not a problem.

-11113 Essential service fails to start so the server/dispatcher process should exit.

-11114 Services load timeout has been reached. In case the value of
"haltOnServiceTimeout" property of ServiceManager is true server/dispatcher
process would exit.

Tuesday, August 25, 2009

SAP executables will fail to run because of Microsoft ATL Patch.

Background information: A recent security update of Microsoft`s ATL(Active Template Library) resulted in an updated Visual Studio and an updated c-runtime. All SAP executables(sapstart.exe, sapstartsrv.exe, etc...) made with that updated c-runtime will require this updated c-runtime installed on the customers system. Therefore every SAP customer running Windows is need to apply the Microsoft security patch.

Detecting whether an SAP system will not start up due to missing MS patch: Described below are steps that will indicate if a customer is affected by the missing Microsoft security patch.

Try to execute a SAP binary (like sapntchk.exe) on the customers system.
You can do this in two ways.

1) If you started the executable from the command prompt and get the following message,

“The system cannot execute the specified program”


have a look at the event viewer.
To do this either type eventvwr into your command prompt, or Start->Settings->Control Panel->Administrative Tools->Event Viewer.
Continue with section “Event Viewer analysis”.


2) If you double-clicked the executable within Microsoft`s file explorer and you get the following error with pop-up:

E:\patch_test\sapntchk.exe
This application has failed to start because the application configuration is incorrect. Reinstalling the application may fix this problem


have a look at the event viewer.
To do this either type eventvwr into your command prompt, or Start->Settings->Control Panel->Administrative Tools->Event Viewer.
Continue with section “Event Viewer analysis”.

Event Viewer analysis:

In the tree display click the System entry like shown below.


Now scan the list on the right side and search for the source "SideBySide" like below:


Now click on these events and check for one of the following messages:

Friday, August 21, 2009

Business Server Pages Do you want to edit pages Using Proxies

This troubleshooting guide describes all the different problems observed with the use of proxies.

WARNING IN RED: Unforunately, this is a very complex topic! It is recommended at all times to first fetch a cup of coffee and secondly to close the office door. Then read this text slowly, word for word. Read it twice! Experience has shown that a number of GoLive! dates could easily have been kept by prudent reading skills on this one topic alone. This warning is in the spirit of a helping hand. Let us learn from past experience!


What Proxies are Supported?


In principle, when the term proxy is used within this text, we usually and silently refer to a SAP Web Dispatcher. However, in principle, any form of proxy can be used, as long as it obeys the constrains of what we require from a proxy. Most of it will also be listed below as part of the troubleshooting guide.


Documentation


Most of the aspects on the generation of URLs in the context of a proxy is described in URL Generation in an AS-ABAP - Web Dispatcher Configuration . This page is written and continuously updated from OSS support work. As such, we will find large amounts of duplicate information. The documentation itself is written in the form of A to Z, convering the topic systematically. This page is written more in the sense of a troubleshooting guide, containing questions to help troubleshoot a problem to a final solution. It effectively highlights again the documentation. What to read? Both! Twice! (Don't forget the coffee and to close the office door.)

For general information about SAP Web Dispatcher, see the corresponding documentation . Just to stress this point one final time: A number of complex OSS trouble tickets could have been completely avoided by one careful reading session! Make the time this once, it is really worth it!

URL Generation Concepts


Although far off-topic for the immediate discussion of proxies, the basic concepts must be understood.

A URL for a page is written in the form of http(s)://server.domain.ext:port/URL. After the HTML for the page is loaded, all other URLs on the page itself are server-relative. They are either of the form /URL2 or just URL3 or ../URL3. The written URLs within the HTML code will (usually!) never contain a protocol (http(s)://) part, and as such does not hard contain any server references.

The first important aspect to understand is that each and every request from the browser is always server-absolute. This is a must in the world of HTTP! What it means is that each and every incoming HTTP request is triggered by an URL of the form http(s)://server.domain.ext:port/URL, that is, with protocol, server, port and server-relative URL. (For interested reader, if the port has the default value of 80 for HTTP or 443 for HTTPS, it is usually not listed.)

So how does the browser build up these correct URLs? The trick is that the browser will always take the missing parts of information from the URL of the current page that is displayed. In the case of the absolute URL shown above, the browser will take the current active protocol and server information, and generate a new server-absolute URL: http(s)://server.domain.ext:port/URL2.

In the case of a relative URL, the browser will again use the information from the current loaded page to construct a server-absolute URL: http(s)://server.domain.ext:port/URL3. What we notice in this game, is that as long as URLs in HTML pages never contain a protocol (http(s)://) or any form of server information (server.domain.ext:port), URL generation will always work correctly, independent of the actual protocol in use. This is why most code will work correctly in context of a proxy.

So why do we even have problems with proxies? (And why all this complex text?) There are typically two (plus one special one) cases where server-absolute URLs must be generated. And these usually fail if not carefully done.

Wednesday, August 19, 2009

Analyzing issues with Single Sign On (SSO)

Differentiate the possible implementations/solutions

The initial step to approach problems in SSO, of course, is to identify what SSO solution actually is being used. A first indicator is the client software: do you use a Web browser for accessing your servers, or do you use SAP's "classical" client program SAPGUI (sometimes called WinGUI)?

Attention: Newer client development and the related use of words make it easy to mix up certain versions of the Web browser-based clients with SAP's standalone client SAPGUI for ABAP servers. In the context of this note, the term SAPGUI will not be used for those Web-browser based clients.

Web browser-based clients can use either of the following mechanisms for implementing SSO:
- SAP logon tickets (covered in this note) or
- X.509 client certificates (covered in this note) or
- SAML Browser/Artifact Profile

The SAPGUI always requires Secure Network Communications (SNC) for SSO.

Typical Scenarios

The most common situation where SSO is used are system landscapes that are made accessible by an SAP Enterprise Portal.

Here, usually SAP logon tickets are used, because they are easily available and can be created and accepted by all SAP server products. In a typical portal landscape, the SAP Enterprise Portal issues the user a logon ticket after the initial logon, which is then used for further authentication purposes, both in the portal itself as well as in all SAP back-end systems that are being made accessible from the portal. Some third party services can also use the SAP logon ticket for authentication through the use of SAPSSOEXT (a Java-based toolkit for verifying SAP logon tickets).

A completely different situation exists when the client software for accessing ABAP-based SAP servers is SAPGUI. With SAPGUI, the only way to implement SSO is to install SNC. SNC, in turn, can be implemented in a number of ways - but it always makes use of the GSS interface provided by SAPGUI and the ABAP-based SAP servers.

For more general information about SSO, see SAP Notes 138498 and 550742.

In the following, I refer to the servers involved as the AS ABAP and the
AS Java for ABAP-based and Java-based system, respectively.

Solution

In the following, you will find hints on how to analyze problems with logon and Single Sign-On, ordered by the technical means for authentication that are being used.

1. SSO based on SAP Logon Tickets

SAP logon tickets are messages that confirm a successful (primary) logon. They are created on the SAP server and are passed to the user's client. From there, they are also passed to the intended target system(s) (in newer implementations also directly to the target system). SAP logon tickets provide a "simple", but proprietary solution for Single Sign-On.

The actual strategy for analyzing problems with SAP logon tickets is to follow the path of the SAP logon ticket from its creation, and then along the paths it takes in the network, until it is finally received and verified in the destination server.
The (now outdated) note 356691 is intended to help with this, but it refers
to older releases, where the "standalone Internet Transaction Server (ITS)" was common for Web-based access.

To assert the authenticity of a user, SAP logon tickets make use of digital signatures based on the DSA algorithms. As a consequence, Secure Store and Forward (SSF) needs to be configured correctly to be able to verify the logon tickets. This includes the configuration for trusting the SAP logon ticket issuer (in terms of SSF), which is done by storing the logon ticket issuer's public key (certificate) in the target system's certificate store. (The target system is the system that verifies the incoming logon ticket.) Additionally, the logon ticket issuer needs to be entered into an access control list (ACL). The required steps differ between the involved system's base technology (ABAP or Java), but from the SSF point of view, they serve the same purpose.

Tuesday, August 18, 2009

How to change copy right text on SAP EP logon screen

1) Copy the file with the name ”com.sap.portal.runtime.logon.par” from the following location. It has the additional ending ".bak", which you should remove on your local copy:

\\j2ee\cluster\server<#>\apps\sap.com\irj\servlet_jsp\irj\root\WEB-INF\deployment\pcd\

2) Import the PAR file into NetWeaver Developer Studio:

- Select File>Import.
- Choose the option PAR file. Select Next and a popup window appears.
- In the window you have 3 text fields: The location of the par file, a project name (which will also be the new par file name) and the location where the project should be saved.


3) Manually unzip the par file using WinZip or WinRar and copy “umelogonbase.jar” and “com.sap.portal.runtime.logon_api.jar” files from PORTAL-INF\lib to newly created project\dist\PORTAL-INF\lib.

4) Un zip umelogonbase.jar and open “logonLabels_xx.properties”; here “xx” is language of the specific browser. Edit the text which you want to change and save the changes.

5) Now select all files under umelogonbase folder and zip using WinZip or WinRar

6) Rename “umelogonbase.zip” to “umelogonbase.jar” and don’t forget to remove original umelogonbase.jar before renaming.

7) From NWDS right click on dist and select Quick Par upload and give full path and file name which is “com.sap.portal.runtime.logon.par”.

8) Now upload the new par file: system Administration -> support -> Portal runtime -> Administration console -> browse for the new file and click on upload.

9) Restart of engine is not required.

Tuesday, August 11, 2009

NW 6.40(2004) SPS(Support Package Stack) 19 Upgrade

Unlike in NW7.0, in NW 2004 SPS upgrade needs to be done using sapinst tool as there is no JSPM in NW 2004.

Note: JSPM tool was introduced in NW 7.0

In order to apply the Support Package Stack in NW 2004, you need upgrade each Usage type separately in following order:

o SAP Web AS Java
o Enterprise Portal (EP)
o Knowledge Management & Collaboration (KMC)

• Download SPS19 upgrade files from service.sap.com. Naming convention is mentioned separately for each Usage Type.

SP stacks for SAP WEB AS Java 6.40 -->

1. Download latest JCE Policy file from sun.java.com

2. Download below support packages from Service Market Place(www.service.sap.com)

J2EERT_.SAR: J2EERT19_0-10001982.SAR
SAPINST_.SAR: SAPINST19_0-10002790.SAR
CTRL_.SAR: CTRLORA19_0-20000121.SAR
J2EERTOS_.SAR: J2EERTOS19_0-20000121.SAR

3. Extract above 4 SAR files using SAPCAR.

4. Then change to directory where sapinst is existed:


5. Run sapinst


6. Select Import Support Package 19 and click on Next


7. Browse for instance profile and select, and then click on Next


8. Give JDK Home directory path and click on Next


9. Give location for JCE Policy Archive and click on Next


10. As we need to update only Java components first,keep default selection and click on Next


11. Sapinst itself will take the PREREQUISITE CHECK XML in this step. Click on Next


12. If you found any conditions does not met like below, check what needs to be adjusted in order to meet the prerequisites.
In this case Soft Resource Limit file descriptors was not met the condition.


13. Check Soft resource limit description size by using ulimit –n.
14. In this case the value is 1024.
15. If needed change the value using ulimit -d
&nbsp&nbsp&nbsp&nbsp&nbsp&nbsp&nbsp&nbspE.g.: ulimit –d


16. Then click on Next


17. Click on Start


18. Press on Retry button and try again to avoid the error


19. Press on OK button


20. Click on OK


21. Open System info page and check whether Upgrade completed successfully or not.


Updating the Portal Platform:

1. Extract following 4 files using SAPCAR in order to upgrade to sp19

Note: Before uncaring files rename old uncared folders
to avoid over writing.

Portal Platform 6.0_640:

EP6CTRL_.SAR: EP6CTRL19_0-10002790.SAR
EP6TOOLS_.SAR: EP6TOOLS19_0-20000394.SAR
EP6PORTAL_.SAR: EP6PORTAL19_0-20000394.SAR
SAPINST_.SAR: SAPINST19_0-20000121.SAR

2. Then change to following directory and start sapinst


3. Enter Administrator user and password for that user and click on Next


4. When updating SP Stack, the SDM should be in safe mode. And sapinst itself will take care of this.

5. In this step, it will ask whether to stay in Safe mode after applying patches or switch back to Normal mode once upgrade is done.

6. Keep default selection and click on Next


7. Click on Start to start with Portal Upgrade


8. Click on OK button to confirm the portal platform upgrade.


9. Open portal and check whether upgrade completed successfully or not.


Updating the KMC:

1. Extract following 4 files using SAPCAR

Note: Before uncaring files rename old uncared folders to avoid over writing.

CM+COLLABORATION 6.0_640:

EP6KMC_.SAR: EP6KMC19_0-10002972.SAR
EP6CTRL_.SAR: EP6CTRL19_0-10002790.SAR
EP6TOOLS_.SAR: EP6TOOLS19_0-20000394.SAR
SAPINST_
.SAR: SAPINST19_0-20000121.SAR

2. Change to following directory and start sapinst


3. Enter Administrator user name and password for that user


4. When updating SP Stack, the SDM should be in safe mode. And sapinst itself will take care of this.

5. In this step, it will ask whether to stay in Safe mode after applying patches or switch back to Normal mode once upgrade is done.

6. Keep default selection and click on Next.


7. Click on Start button to start installation


Saturday, August 1, 2009

Designing a new Theme – Changing the Banner and Logo in SAP Portal

Old


New


Table of Contents
1. Portal Theme, Portal Framework, Portal Desktop
2. New Theme - Designing
3. Include Theme to ‘Portal Desktop’
4. Changing the Theme – Single User
5. Changing the Theme – Default theme for all the Users
6. Deleting a Theme
7. Exporting and importing a Theme
8. Reference


1. Portal Theme, Portal Framework, Portal desktop
A portal theme defines the visual appearance of the control elements, font size, colors, and contrast of the user interface elements of a portal desktop. A portal theme does not define the layout, structure, or contents of a portal desktop. This is defined by the default framework page. Neither the framework page nor the portal theme are directly assigned to a user. Combinations of framework pages and portal themes result in portal desktops. Portal desktops are assigned to users
Steps in personalizing a theme include:


2. New Theme – Designing

2.1 Go to System Administration -> Theme Editor


2.2 Select any Theme Templates for creating a new theme