Introduction:
Use:
The enhanced Change and Transport System (CTS+) enables you to transport Java objects and SAP-related non-ABAP applications in your system landscape, alongside ABAP objects. You can also administer non-ABAP systems in a CTS transport domain in SAP NetWeaver Application Server ABAP.
Transportable Objects:
You can use CTS+ to transport the following additional objects:
•Java-based and J2EE-based objects:
Software Component Archives (SCAs)
Enterprise Application Archives (EARs)
Software Deployment Archives (SDAs)
•Objects from the SAP NetWeaver usage type SAP NetWeaver Portal (EP):
Enterprise Portal Archives (EPAs)
Enterprise Portal Applications (PARs)
Knowledge Management objects (KM Content and KM Configurations)
•Non-ABAP objects from the SAP NetWeaver usage type PI (Process Integration):
Integration Builder objects (TPZs)
System Landscape Directory content objects (products, software components, technical systems, and business systems)
Configuration – Concept:
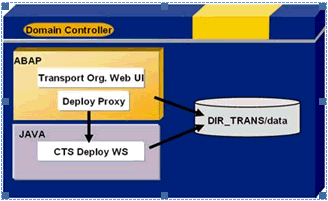
The following three components must be configured before you can use the enhanced Change and Transport System.
• CTS Deploy Web service (SAP NetWeaver AS Java)
This is a Java Web service responsible for communicating with the deployment tools in non-ABAP systems. The transport control program tp communicates with the CTS Deploy Web service when deploying the non-ABAP objects.
• CTS Deploy proxy (SAP NetWeaver AS ABAP)
A CTS Deploy proxy is needed on the ABAP side to enable the transport control program tp on SAP NetWeaver AS ABAP to communicate with the CTS Deploy Web service on SAP NetWeaver AS Java.
• Transport Organizer Web UI (SAP NetWeaver AS ABAP)
This is an Web Dynpro ABAP application in which you create and edit transport requests for non-ABAP systems.
The figure below is a simple depiction of how these three components interact:
Configuring the CTS Deploy Web Service:
Use:
The CTS Deploy Web service connects the ABAP transport tools to the deployment tools in the non-ABAP applications.
Prerequisites:
This deployment Web service has been part of SAP NetWeaver 7.0 since Support Package Stack 12.
Information about using the CTS Deploy Web service in another SAP NetWeaver system is available in SAP Note 1003674.
Checking the CTS Deploy Web Service:
1. In SAP NetWeaver Application Server Java, open the CTS server.
2. In your Web browser, enter the following URL:
http://
3. Open Web Service Navigator.
The DeployProxy Web service is in the list of deployment Web services.
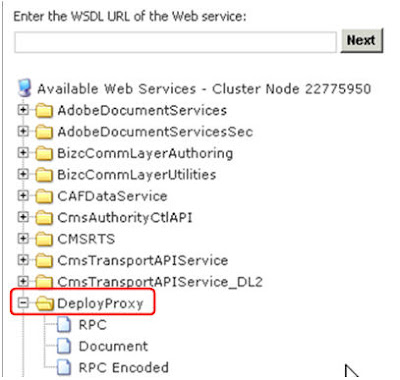
Note: If you couldn’t find the service, deploy the patch DI CHANGE MGMT SERVER 7.00 as per the SAP Note no: 1076189
Configuring the HTTP Connection:
You are in SAP NetWeaver Application Server ABAP in your CTS system.
1. Call transaction SM59.
2. Create a new HTTP connection called CTSDEPLOY.
3. Choose the Technical Settings tab page.
a. Enter the name of the target host, the service number (500), and the path prefix /DeployProxy/default?style=document. Confirm by choosing Enter.
b. If you encounter warnings about invalid query strings or missing documentation, ignore them by choosing Enter.
c. Save your entries.

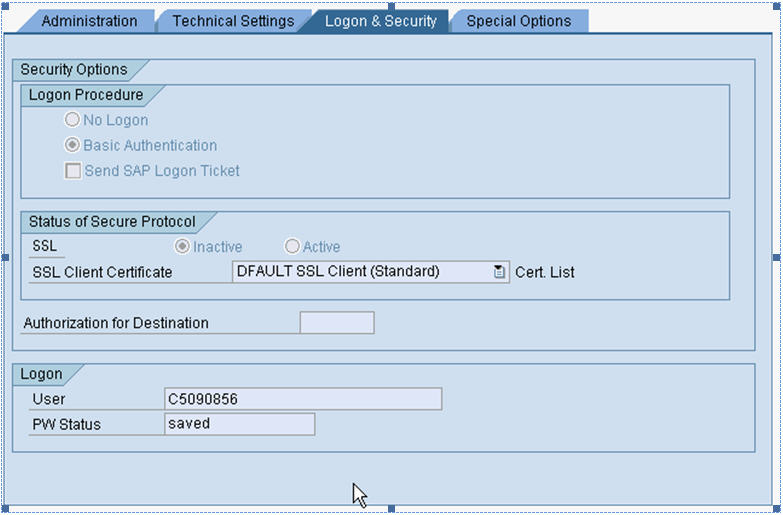
4. Choose the Logon and Security tab page.
a. Select Basic Authentication as the logon procedure.
b. Enter a J2EE user name and password.
c. Save your entries.

5. To test the new HTTP connection, choose Connection Test.

6. Choose Continue to confirm.
If you have created the new HTTP connection successfully, the status text in the test results is set to OK.
Setting a Timeout for the Deployment:
Use:
Large objects can cause timeouts in deployments. Always set the timeout to be longer than the longest expected deployment time.
Procedure:
You are in SAP NetWeaver Application Server ABAP in your CTS system.
1. Call transaction SM59.
2. Choose HTTP Connections to External Server ® CTSDEPLOY.
3. Select the Special Options tab page.
The ICM Default Timeout option is selected as the default under Timeout.
Select a timeout that is higher than the longest expected deployment. If in doubt, select No Timeout to avoid the connection timing out during a deployment.

Configuring the Logical Port for the Web Service:
Use:
Logical ports for Web services are Customizing objects.
Prerequisites:
To configure a logical port, you must enable Customizing changes to be made in client 000. You can cancel these changes once you have configured the CTS Deploy Web service.
Setting the System Change Option:
You are in SAP Net Weaver Application Server ABAP in your CTS system.
1. Call transaction SE03.

2. Choose Administration ® Set System Change Option and choose Execute.
The System Change Option screen appears ->

3. Choose Client Setting.
The Display “Clients” View: Overview screen is displayed.
4. Select the client 001(The client which you are going to use for CTS+ Transport Requests).
5. Choose Change ® Display.
A dialog box with the messageCaution: The table is cross-client. appears.
6. Choose Continue to confirm.
7. Make the following changes:
a. Choose Detail.
The Display “Clients” View: Detail screen is displayed.
b. Select Automatic Recording of Changes.

8. Save your entries.
Creating a Logical Port:
You are in SAP Net Weaver Application Server ABAP in your CTS system.
1. Log on to client 000.
2. User must be other than DDIC and SAP*.
3. Call transaction LPCONFIG.
The Display/Create Logical Port screen is displayed.

4. Select the proxy class CO_TFLDEPLOY_PROXY_VI_DOCUMENT from the proxy list.
5. Enter CTSDEPLOY as the logical port.
6. Choose Create.
The Edit Logical Port screen is displayed.

7. Enter a description for the logical port and select the Default Port checkbox.
8. Under General Settings, choose the Call Parameters tab page.
9. Select CTSDEPLOY as the HTTP destination.
10. Save your entries.
A dialog box is displayed that prompts you to specify a customizing request.
11. Enter your changes in a change request.
12. Activate the logical port of the CTS Deploy Web service.
Activating the Web Service for Transport Organizer Web UI:
Use:
To check in non-ABAP objects to a transport request, you must activate the Web service CTS_BROWSER.
Prerequisites:
• You have authorization for transaction SICF.
• All ICF services required to run an ABAP Web Dynpro application are activated.
Note: For more information, see SAP Note 517484.
Procedure:
1. Call transaction SICF. This transaction is a cross-client transaction.
2. Enter SERVICE in the Hierarchy Type field and CTS_BROWSER in the Service Name field.
3. Choose Execute

4. Select the Web service (CTS_BROWSER) on the Maintain Services screen.
5. Activate the Web service by opening the context menu (secondary mouse button) and choosing Activate Service.
A dialog box for activating IFC services is displayed.

6. Choose Yes (with tree icon).
If you want to test the Web service, open the context menu (secondary mouse button) and choose Test Service.
Starting Transport Organizer Web UI:
Use:
You must start Transport Organizer Web UI before you can begin editing and organizing your transport requests.
Prerequisites:
You have set the parameter NON_ABAP_WBO_CLIENT.
Procedure:
1. Log on to the SAP system client with the user and password that you want to use to start Transport Organizer.
2. To start Transport Management System (TMS), call transaction STMS.
3. To do this, choose Environment -> Transport Organizer Web UI.
This starts Transport Organizer Web UI for the client to which you are logged on.

4. In the System dialog box, choose the system ID of the system for which you want to organize your transport request. This is usually the development system.

5. In other way, you can use below URL to open Transport Organizer Web UI:
http://:/sap/bc/webdynpro/sap/cts_browser?SYSID=
Customizing for Application Types:
Use:
The application type is purely a display attribute and does not determine the deployment method. Application types are used in the CTS_BROWSER Web Dynpro to classify attached objects. You can also add your own application types manually in the table CTS_RQ_APPLID.
Procedure:
1. Call transaction SE16.
The Data Browser: Initial Screen appears.
2. In the Table Name field, enter CTS_RQ_APPLID.
3. Choose Table Contents or Enter.
The Data Browser: Table CTS_RQ_APPLID: Selection Screen appears.

4. Leave the Application field empty and choose Execute.
The Table CTS_RQ_APPLID screen appears.

5. Choose Create if the application type doesn’t exist.
The Insert Table CTS_RQ_APPLID screen appears.
6. Enter the name of the application in the Application field.
When you choose the F4 help in the Application field, the application name you entered appears in the list box.
7. Enter a description of your application type in the Description field.
8. Save your entries.

Defining and Configuring Non-ABAP Systems:
Use:
When you create a transport landscape in Transport Management System (TMS), you define how you want objects to be transported between systems in the different phases (development, quality assurance, and production) of the software lifecycle.
Prerequisites:
You have configured the CTS Deploy web service.
Creating Non-ABAP Systems:
You are in your TMS domain controller.
1. Call transaction STMS.
2. Choose System Overview.
3. Choose SAP System -> Create -> Non-ABAP System.
The TMS: Configure Non-ABAP System dialog box is displayed.

4. Create the non-ABAP system with a system ID and a description.
5. Select the CTS system as the communication system.
6. Make the following settings, depending on whether your system is a source system or a target system (or both):
o Non-ABAP system as source system
Under Source System Settings, select the Activate Transport Organizer flag and enter the client where you want to use Transport Organizer.

o Non-ABAP system as target system
Under Target System Settings, select the Activate Deployment Service flag. Select your preferred deployment methods and fill out the rest of the fields accordingly.

7. Enter a system user and password for your preferred deployment methods.

8. Save your settings and confirm that you want to distribute the TMS configuration.
The system now generates all parameters and their values automatically by default. To display these parameters, select your system in the system overview and choose the Transport Tool tab page.

Configuring Transport Routes:
1. Goto STMS and Select Transport Routes in Overview menu

2. It will open below window to configure Transport Routes. Change to Edit Mode as below

3. In Menu Option: Configuration -> Standard Configuration -> Select appropriate Configuration option according to your landscape requirements.
Here we have selected Development and Production System.

4. Enter both Development System and Production system SIDs as below:

5. It will create Transport Routes in between above two mentioned systems. Save the configuration.

6. In below popup click Yes to distribute and Activate the configuration.

Configuring the Destination Service:
Use:
Before you can attach objects to transport requests directly in the application, you must first use RFC to connect your SAP application system (such as SAP NetWeaver PI or SAP NetWeaver Portal) to the CTS server. This enables your application to communicate with the transport system.
Prerequisites:
• You have change authorization in Visual Administrator.
• You have a user with the appropriate authorizations in SAP NetWeaver Application Server Java.
Procedure:
1. Open Visual Administrator on the installation drive of SAP Application Server Java.
2. Choose Cluster -> Server -> Services -> Destinations.
3. Create an RFC connection called sap.com/com.sap.tc.di.CTSserver by choosing Create.
4. Under Connection Settings, enter the connection data of your CTS server.
5. Under Logon Data, select the Current User (Logon Ticket) option as authentication for the connection to your CTS server. We recommend that you use Single Sign-On (SSO).
If you cannot use SSO, select the Configured User option and enter your preferred language, a client, and an appropriate user and password.
Enter the client entered in the parameter NON_ABAP_WBO_CLIENT in TMS.
6. Use the default settings under Repository Connection and Pool Settings.
7. Save your entries.
If you want to test the connection, choose Save and Test.


Choosing a Transport Strategy:
Use:
You can influence the behavior of the transport system when you create and release transport requests by configuring the strategy parameters. In this way, you provide optimum support for your chosen transport process (automatic or manual creation and release of requests).
You only require these parameters for applications that have a close coupling with the CTS system (such as SAP NetWeaver Portal systems and SAP NetWeaver PI systems).
Prerequisites:
You have configured the connection between your application and the CTS server.
Procedure:
1. Call transaction STMS.
2. Choose Overview ® Systems.
3. Select a system.
4. The screen Display TMS Configuration: System appears.
5. Choose the Transport Tool tab page.
6. Switch to change mode.
7. Add the following parameters:
o WBO_GET_REQ_STRATEGY - smart
Automatically creates a transport request when you export an object from an SAP NetWeaver Portal system or an SAP NetWeaver PI system.
The following values are possible:
Smart
The system creates a transport request (if not already available) and flags it as the standard request.
Tagged
This is configured as the default value in the system. You must have created a transport request already in Transport Organizer Web UI and flagged it as the standard request.
o WBO_REL_REQ_STRATEGY - Manual
Automatically releases a transport request in an SAP NetWeaver Portal system or an SAP NetWeaver PI system.
The following values are possible:
Auto
The system releases a transport request automatically as soon as an object is added to the request in an SAP NetWeaver Portal system or an SAP NetWeaver PI system.
Manual
This is configured as the default value in the system. You must release the transport request manually or set the value of the parameter to Auto.

Create Transport Request using Transport Organizer Web UI
1. Use below URL to access Transport Organizer:
'Protocol'://'server':'Web AS Port'/sap/bc/webdynpro/sap/cts_browser?SYSID='SID of Development System as Configured in TMS'
E.g.: http://pwdf4156.wdf.sap.corp:8002/sap/bc/webdynpro/sap/cts_browser?SYSID=CAI
2. Transport Organizer will look like below. Click on Create Request to create new Request.

3. Mention Short Description and Owner of Request. Project field can be left blank.

4. Click on Attach Object to attach non ABAP Object to Transport Request.

5. In pop up window, select Client and Browse for the file and click on OK

o Client: Search for the file on your desktop and confirm by choosing OK.
o Server: Search the directory defined in the parameter NON_ABAP_WBO_INBOX for the appropriate source system. Select the file in this directory and confirm by choosing OK.
6. You can check the attached Non-ABAP Object in Object List Tab as below:

7. Now click on Release to Release the Request to Transport Queue.

Document References
1. https://websmp108.sap-ag.de/changecontrol
2. http://help.sap.com/saphelp_nw70/helpdata/EN/45/ec25370fdc3481e10000000a1553f6/frameset.htm
Use:
The enhanced Change and Transport System (CTS+) enables you to transport Java objects and SAP-related non-ABAP applications in your system landscape, alongside ABAP objects. You can also administer non-ABAP systems in a CTS transport domain in SAP NetWeaver Application Server ABAP.
Transportable Objects:
You can use CTS+ to transport the following additional objects:
•Java-based and J2EE-based objects:
Software Component Archives (SCAs)
Enterprise Application Archives (EARs)
Software Deployment Archives (SDAs)
•Objects from the SAP NetWeaver usage type SAP NetWeaver Portal (EP):
Enterprise Portal Archives (EPAs)
Enterprise Portal Applications (PARs)
Knowledge Management objects (KM Content and KM Configurations)
•Non-ABAP objects from the SAP NetWeaver usage type PI (Process Integration):
Integration Builder objects (TPZs)
System Landscape Directory content objects (products, software components, technical systems, and business systems)
Configuration – Concept:
The following three components must be configured before you can use the enhanced Change and Transport System.
• CTS Deploy Web service (SAP NetWeaver AS Java)
This is a Java Web service responsible for communicating with the deployment tools in non-ABAP systems. The transport control program tp communicates with the CTS Deploy Web service when deploying the non-ABAP objects.
• CTS Deploy proxy (SAP NetWeaver AS ABAP)
A CTS Deploy proxy is needed on the ABAP side to enable the transport control program tp on SAP NetWeaver AS ABAP to communicate with the CTS Deploy Web service on SAP NetWeaver AS Java.
• Transport Organizer Web UI (SAP NetWeaver AS ABAP)
This is an Web Dynpro ABAP application in which you create and edit transport requests for non-ABAP systems.
The figure below is a simple depiction of how these three components interact:

Configuring the CTS Deploy Web Service:
Use:
The CTS Deploy Web service connects the ABAP transport tools to the deployment tools in the non-ABAP applications.
Prerequisites:
This deployment Web service has been part of SAP NetWeaver 7.0 since Support Package Stack 12.
Information about using the CTS Deploy Web service in another SAP NetWeaver system is available in SAP Note 1003674.
Checking the CTS Deploy Web Service:
1. In SAP NetWeaver Application Server Java, open the CTS server.
2. In your Web browser, enter the following URL:
http://
3. Open Web Service Navigator.
The DeployProxy Web service is in the list of deployment Web services.

Note: If you couldn’t find the service, deploy the patch DI CHANGE MGMT SERVER 7.00 as per the SAP Note no: 1076189
Configuring the HTTP Connection:
You are in SAP NetWeaver Application Server ABAP in your CTS system.
1. Call transaction SM59.
2. Create a new HTTP connection called CTSDEPLOY.
3. Choose the Technical Settings tab page.
a. Enter the name of the target host, the service number (5
b. If you encounter warnings about invalid query strings or missing documentation, ignore them by choosing Enter.
c. Save your entries.

4. Choose the Logon and Security tab page.
a. Select Basic Authentication as the logon procedure.
b. Enter a J2EE user name and password.
c. Save your entries.
5. To test the new HTTP connection, choose Connection Test.

6. Choose Continue to confirm.
If you have created the new HTTP connection successfully, the status text in the test results is set to OK.
Setting a Timeout for the Deployment:
Use:
Large objects can cause timeouts in deployments. Always set the timeout to be longer than the longest expected deployment time.
Procedure:
You are in SAP NetWeaver Application Server ABAP in your CTS system.
1. Call transaction SM59.
2. Choose HTTP Connections to External Server ® CTSDEPLOY.
3. Select the Special Options tab page.
The ICM Default Timeout option is selected as the default under Timeout.
Select a timeout that is higher than the longest expected deployment. If in doubt, select No Timeout to avoid the connection timing out during a deployment.

Configuring the Logical Port for the Web Service:
Use:
Logical ports for Web services are Customizing objects.
Prerequisites:
To configure a logical port, you must enable Customizing changes to be made in client 000. You can cancel these changes once you have configured the CTS Deploy Web service.
Setting the System Change Option:
You are in SAP Net Weaver Application Server ABAP in your CTS system.
1. Call transaction SE03.

2. Choose Administration ® Set System Change Option and choose Execute.
The System Change Option screen appears ->

3. Choose Client Setting.
The Display “Clients” View: Overview screen is displayed.
4. Select the client 001(The client which you are going to use for CTS+ Transport Requests).
5. Choose Change ® Display.
A dialog box with the messageCaution: The table is cross-client. appears.
6. Choose Continue to confirm.
7. Make the following changes:
a. Choose Detail.
The Display “Clients” View: Detail screen is displayed.
b. Select Automatic Recording of Changes.

8. Save your entries.
Creating a Logical Port:
You are in SAP Net Weaver Application Server ABAP in your CTS system.
1. Log on to client 000.
2. User must be other than DDIC and SAP*.
3. Call transaction LPCONFIG.
The Display/Create Logical Port screen is displayed.

4. Select the proxy class CO_TFLDEPLOY_PROXY_VI_DOCUMENT from the proxy list.
5. Enter CTSDEPLOY as the logical port.
6. Choose Create.
The Edit Logical Port screen is displayed.

7. Enter a description for the logical port and select the Default Port checkbox.
8. Under General Settings, choose the Call Parameters tab page.
9. Select CTSDEPLOY as the HTTP destination.
10. Save your entries.
A dialog box is displayed that prompts you to specify a customizing request.
11. Enter your changes in a change request.
12. Activate the logical port of the CTS Deploy Web service.
Activating the Web Service for Transport Organizer Web UI:
Use:
To check in non-ABAP objects to a transport request, you must activate the Web service CTS_BROWSER.
Prerequisites:
• You have authorization for transaction SICF.
• All ICF services required to run an ABAP Web Dynpro application are activated.
Note: For more information, see SAP Note 517484.
Procedure:
1. Call transaction SICF. This transaction is a cross-client transaction.
2. Enter SERVICE in the Hierarchy Type field and CTS_BROWSER in the Service Name field.
3. Choose Execute

4. Select the Web service (CTS_BROWSER) on the Maintain Services screen.
5. Activate the Web service by opening the context menu (secondary mouse button) and choosing Activate Service.
A dialog box for activating IFC services is displayed.

6. Choose Yes (with tree icon).
If you want to test the Web service, open the context menu (secondary mouse button) and choose Test Service.
Starting Transport Organizer Web UI:
Use:
You must start Transport Organizer Web UI before you can begin editing and organizing your transport requests.
Prerequisites:
You have set the parameter NON_ABAP_WBO_CLIENT.
Procedure:
1. Log on to the SAP system client with the user and password that you want to use to start Transport Organizer.
2. To start Transport Management System (TMS), call transaction STMS.
3. To do this, choose Environment -> Transport Organizer Web UI.
This starts Transport Organizer Web UI for the client to which you are logged on.

4. In the System dialog box, choose the system ID of the system for which you want to organize your transport request. This is usually the development system.

5. In other way, you can use below URL to open Transport Organizer Web UI:
http://
Customizing for Application Types:
Use:
The application type is purely a display attribute and does not determine the deployment method. Application types are used in the CTS_BROWSER Web Dynpro to classify attached objects. You can also add your own application types manually in the table CTS_RQ_APPLID.
Procedure:
1. Call transaction SE16.
The Data Browser: Initial Screen appears.
2. In the Table Name field, enter CTS_RQ_APPLID.
3. Choose Table Contents or Enter.
The Data Browser: Table CTS_RQ_APPLID: Selection Screen appears.

4. Leave the Application field empty and choose Execute.
The Table CTS_RQ_APPLID screen appears.

5. Choose Create if the application type doesn’t exist.
The Insert Table CTS_RQ_APPLID screen appears.
6. Enter the name of the application in the Application field.
When you choose the F4 help in the Application field, the application name you entered appears in the list box.
7. Enter a description of your application type in the Description field.
8. Save your entries.

Defining and Configuring Non-ABAP Systems:
Use:
When you create a transport landscape in Transport Management System (TMS), you define how you want objects to be transported between systems in the different phases (development, quality assurance, and production) of the software lifecycle.
Prerequisites:
You have configured the CTS Deploy web service.
Creating Non-ABAP Systems:
You are in your TMS domain controller.
1. Call transaction STMS.
2. Choose System Overview.
3. Choose SAP System -> Create -> Non-ABAP System.
The TMS: Configure Non-ABAP System dialog box is displayed.

4. Create the non-ABAP system with a system ID and a description.
5. Select the CTS system as the communication system.
6. Make the following settings, depending on whether your system is a source system or a target system (or both):
o Non-ABAP system as source system
Under Source System Settings, select the Activate Transport Organizer flag and enter the client where you want to use Transport Organizer.

o Non-ABAP system as target system
Under Target System Settings, select the Activate Deployment Service flag. Select your preferred deployment methods and fill out the rest of the fields accordingly.

7. Enter a system user and password for your preferred deployment methods.

8. Save your settings and confirm that you want to distribute the TMS configuration.
The system now generates all parameters and their values automatically by default. To display these parameters, select your system in the system overview and choose the Transport Tool tab page.

Configuring Transport Routes:
1. Goto STMS and Select Transport Routes in Overview menu

2. It will open below window to configure Transport Routes. Change to Edit Mode as below

3. In Menu Option: Configuration -> Standard Configuration -> Select appropriate Configuration option according to your landscape requirements.
Here we have selected Development and Production System.

4. Enter both Development System and Production system SIDs as below:

5. It will create Transport Routes in between above two mentioned systems. Save the configuration.

6. In below popup click Yes to distribute and Activate the configuration.

Configuring the Destination Service:
Use:
Before you can attach objects to transport requests directly in the application, you must first use RFC to connect your SAP application system (such as SAP NetWeaver PI or SAP NetWeaver Portal) to the CTS server. This enables your application to communicate with the transport system.
Prerequisites:
• You have change authorization in Visual Administrator.
• You have a user with the appropriate authorizations in SAP NetWeaver Application Server Java.
Procedure:
1. Open Visual Administrator on the installation drive of SAP Application Server Java.
2. Choose Cluster -> Server -> Services -> Destinations.
3. Create an RFC connection called sap.com/com.sap.tc.di.CTSserver by choosing Create.
4. Under Connection Settings, enter the connection data of your CTS server.
5. Under Logon Data, select the Current User (Logon Ticket) option as authentication for the connection to your CTS server. We recommend that you use Single Sign-On (SSO).
If you cannot use SSO, select the Configured User option and enter your preferred language, a client, and an appropriate user and password.
Enter the client entered in the parameter NON_ABAP_WBO_CLIENT in TMS.
6. Use the default settings under Repository Connection and Pool Settings.
7. Save your entries.
If you want to test the connection, choose Save and Test.


Choosing a Transport Strategy:
Use:
You can influence the behavior of the transport system when you create and release transport requests by configuring the strategy parameters. In this way, you provide optimum support for your chosen transport process (automatic or manual creation and release of requests).
You only require these parameters for applications that have a close coupling with the CTS system (such as SAP NetWeaver Portal systems and SAP NetWeaver PI systems).
Prerequisites:
You have configured the connection between your application and the CTS server.
Procedure:
1. Call transaction STMS.
2. Choose Overview ® Systems.
3. Select a system.
4. The screen Display TMS Configuration: System
5. Choose the Transport Tool tab page.
6. Switch to change mode.
7. Add the following parameters:
o WBO_GET_REQ_STRATEGY - smart
Automatically creates a transport request when you export an object from an SAP NetWeaver Portal system or an SAP NetWeaver PI system.
The following values are possible:
Smart
The system creates a transport request (if not already available) and flags it as the standard request.
Tagged
This is configured as the default value in the system. You must have created a transport request already in Transport Organizer Web UI and flagged it as the standard request.
o WBO_REL_REQ_STRATEGY - Manual
Automatically releases a transport request in an SAP NetWeaver Portal system or an SAP NetWeaver PI system.
The following values are possible:
Auto
The system releases a transport request automatically as soon as an object is added to the request in an SAP NetWeaver Portal system or an SAP NetWeaver PI system.
Manual
This is configured as the default value in the system. You must release the transport request manually or set the value of the parameter to Auto.

Create Transport Request using Transport Organizer Web UI
1. Use below URL to access Transport Organizer:
'Protocol'://'server':'Web AS Port'/sap/bc/webdynpro/sap/cts_browser?SYSID='SID of Development System as Configured in TMS'
E.g.: http://pwdf4156.wdf.sap.corp:8002/sap/bc/webdynpro/sap/cts_browser?SYSID=CAI
2. Transport Organizer will look like below. Click on Create Request to create new Request.

3. Mention Short Description and Owner of Request. Project field can be left blank.

4. Click on Attach Object to attach non ABAP Object to Transport Request.

5. In pop up window, select Client and Browse for the file and click on OK

o Client: Search for the file on your desktop and confirm by choosing OK.
o Server: Search the directory defined in the parameter NON_ABAP_WBO_INBOX for the appropriate source system. Select the file in this directory and confirm by choosing OK.
6. You can check the attached Non-ABAP Object in Object List Tab as below:

7. Now click on Release to Release the Request to Transport Queue.

Document References
1. https://websmp108.sap-ag.de/changecontrol
2. http://help.sap.com/saphelp_nw70/helpdata/EN/45/ec25370fdc3481e10000000a1553f6/frameset.htm
Hi Friend,
ReplyDeleteThis is doc is excellent i have done the CTS+ on our landscape. i would like to know is any documents or blogs available for GRMG heartbeat Monitoring using SAPCCMS agent.
i need this document.
thanks,
Udhaya.
very good and helpful link....good job
ReplyDelete