Introduction
The contents of the roles that are assigned to a user are displayed within top-level and detailed navigation. Both types of navigation allow end users to navigate through their content. Before configuring your top-level navigation, you need to develop a concept of the navigation requirements of the particular roles. How you define the navigation type affects what is displayed in both top-level and detailed navigation
Below described the configuration steps to make the Two Level Navigation to One Level Navigation.
Step 1: Configuring Top-Level Navigation
In the Portal Catalog choose Portal Users --> Standard Portal Users. This folder contains the Default Framework Page.
Right-click Default Framework Page and choose Open--> Object.
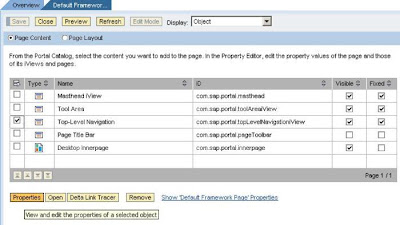
From the Page Content List, select the Top-Level Navigation iView and click Properties In the Navigation property category, scroll to the
Number of Display Levels property and enter the value 0, 1, or 2, depending on how many navigation levels, if any, you want for top-level navigation.
I shall change the value of the property “Number of Display Levels” to 1 as we require only one level navigation on the top.
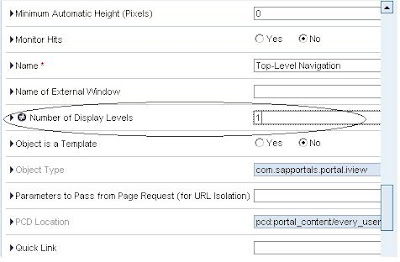
Note: Choosing 0 removes top-level navigation and displays your navigation structure in the Detailed Navigation iView
Click Save.
Step 2: Configure Detailed Level Navigation
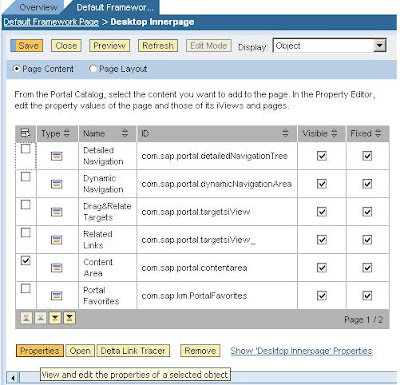
1. From the Page Content List of the Default Framework Page, select Desktop Innerpage and click Open
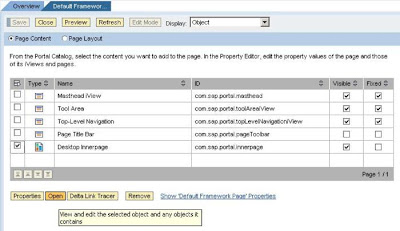
2. From the Page Content List of the Desktop Innerpage select the Detailed Navigation iView and click Properties.
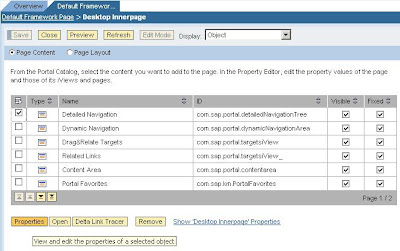
In the Navigation property category, scroll to the Start at Level property and assign a value that is one higherthan the value of the Number of Display Levels property in procedure l. Configure Top-Level Navigation. For example, if top-level navigation is configured for one level, the detailed navigation begins on the second level, that is with the value 2.
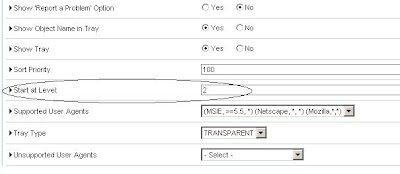
Note: Detailed navigation is not automatically synchronized with top-level navigation; the values that you enter for top-level and detailed navigation must agree. For example, if you enter the value 1 for top-level navigation, while detailed navigation still has the value 3, one level is left out, creating a gap.
Click Save.
Step 3: Configure the Content Area
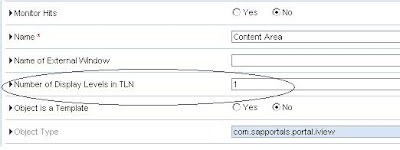
1. From the Page Content List of the Desktop Innerpage, select the Content Area iView and click Properties
In the Navigation property category, scroll to the Number of Display Levels in TLN property and enter the same value as that of the Number of Display Levels property in procedure I. Configure Top-Level Navigation.
3.Click Save.
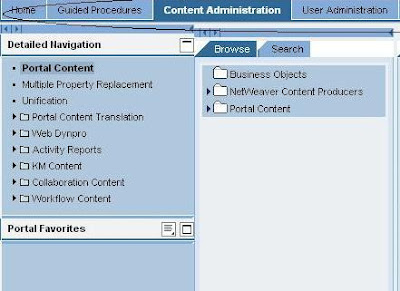
Now, once we refresh the browser we see that the Top Level Navigation has only One Level Navigation as shown in the below image. All the Worksets i.e Second level items are now shown in the Detailed Level Navigation .
The contents of the roles that are assigned to a user are displayed within top-level and detailed navigation. Both types of navigation allow end users to navigate through their content. Before configuring your top-level navigation, you need to develop a concept of the navigation requirements of the particular roles. How you define the navigation type affects what is displayed in both top-level and detailed navigation
Below described the configuration steps to make the Two Level Navigation to One Level Navigation.
Step 1: Configuring Top-Level Navigation
In the Portal Catalog choose Portal Users --> Standard Portal Users. This folder contains the Default Framework Page.
Right-click Default Framework Page and choose Open--> Object.

From the Page Content List, select the Top-Level Navigation iView and click Properties In the Navigation property category, scroll to the
Number of Display Levels property and enter the value 0, 1, or 2, depending on how many navigation levels, if any, you want for top-level navigation.
I shall change the value of the property “Number of Display Levels” to 1 as we require only one level navigation on the top.

Note: Choosing 0 removes top-level navigation and displays your navigation structure in the Detailed Navigation iView
Click Save.
Step 2: Configure Detailed Level Navigation
1. From the Page Content List of the Default Framework Page, select Desktop Innerpage and click Open

2. From the Page Content List of the Desktop Innerpage select the Detailed Navigation iView and click Properties.

In the Navigation property category, scroll to the Start at Level property and assign a value that is one higherthan the value of the Number of Display Levels property in procedure l. Configure Top-Level Navigation. For example, if top-level navigation is configured for one level, the detailed navigation begins on the second level, that is with the value 2.

Note: Detailed navigation is not automatically synchronized with top-level navigation; the values that you enter for top-level and detailed navigation must agree. For example, if you enter the value 1 for top-level navigation, while detailed navigation still has the value 3, one level is left out, creating a gap.
Click Save.
Step 3: Configure the Content Area
1. From the Page Content List of the Desktop Innerpage, select the Content Area iView and click Properties

In the Navigation property category, scroll to the Number of Display Levels in TLN property and enter the same value as that of the Number of Display Levels property in procedure I. Configure Top-Level Navigation.

3.Click Save.
Now, once we refresh the browser we see that the Top Level Navigation has only One Level Navigation as shown in the below image. All the Worksets i.e Second level items are now shown in the Detailed Level Navigation .

No comments:
Post a Comment